Turkey Tales: The Journey to a Perfect Feast
Ah, Thanksgiving – a time for family, friends, and of course, a delicious feast centered around a perfectly cooked turkey. But for many Home cooks, the thought of tackling a 22 pound turkey can be a bit daunting. Fear not, for I am here to guide you through the journey of mastering the art of cooking a 22 pound turkey, step by step.
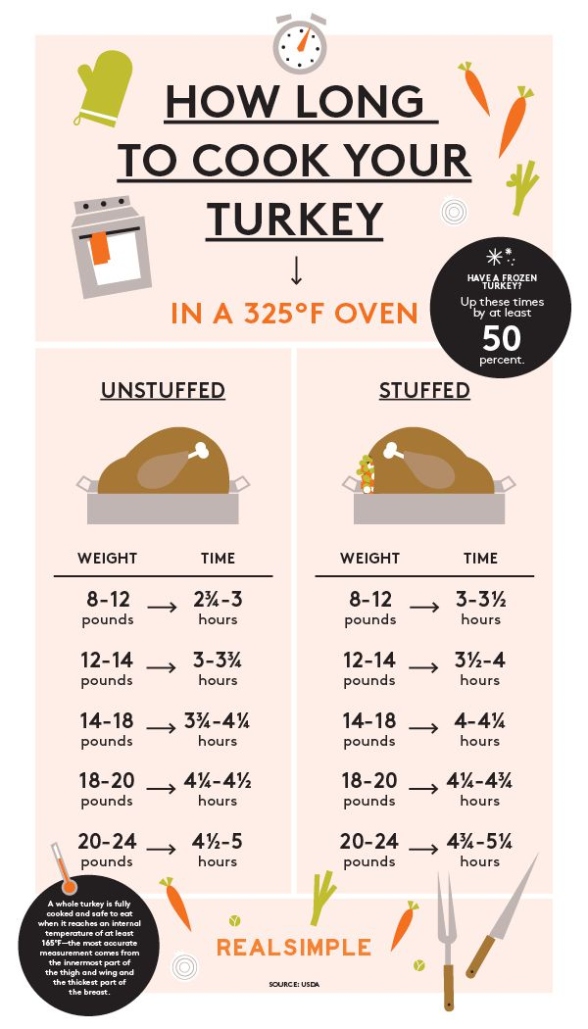
Image Source: realsimple.com
The first step in achieving turkey perfection is selecting the right bird. When choosing a turkey, be sure to opt for a fresh, high-quality bird. Look for a turkey that is plump and free of any tears or discoloration. A good rule of thumb is to plan on about 1 1/2 pounds of turkey per person, so a 22 pound turkey should comfortably feed around 15 people.
Once you have your turkey in hand, it’s time to start the prep work. Thawing a large turkey can take several days, so be sure to plan ahead. The safest way to thaw a turkey is in the refrigerator, allowing 24 hours of thawing time for every 4-5 pounds of turkey. You can also opt for the cold water method, which involves submerging the turkey in cold water, changing the water every 30 minutes. Whichever method you choose, be sure that the turkey is completely thawed before cooking.
With your turkey thawed and ready to go, it’s time to start the seasoning process. A simple yet flavorful seasoning mix of salt, pepper, garlic powder, and herbs can work wonders on a turkey. Be sure to generously season both the inside and outside of the bird, allowing the flavors to penetrate and infuse throughout.
Now comes the fun part – roasting your turkey to perfection. Preheat your oven to 325 degrees Fahrenheit and place your seasoned turkey on a rack in a roasting pan. Cover the breast loosely with foil to prevent over-browning, and roast the turkey until it reaches an internal temperature of 165 degrees Fahrenheit. Baste the turkey every hour with pan juices to keep it moist and flavorful.
As your turkey roasts away in the oven, your kitchen will begin to fill with the mouth-watering aroma of a Thanksgiving feast in the making. It’s a magical moment that signals the start of a delicious meal to come.
Once your turkey reaches the desired temperature, remove it from the oven and let it rest for at least 20 minutes before carving. This allows the juices to redistribute throughout the meat, ensuring a moist and tender bird.
Carving a turkey can be a bit intimidating, but with a little practice and confidence, you’ll be serving up Thanksgiving joy in no time. Start by removing the legs and wings, then slice the breast meat against the grain for maximum tenderness. Don’t forget to save the drippings from the roasting pan to make a rich and flavorful gravy to accompany your turkey.
And there you have it – the journey to a perfect Thanksgiving feast, complete with a beautifully roasted 22 pound turkey. So gather your loved ones around the table, give thanks for all that you have, and enjoy the fruits of your labor. Happy Thanksgiving!
Prepping for Success: Tools and Ingredients
As you embark on the journey of mastering the art of cooking a 22 pound turkey, preparation is key. In order to achieve a perfect feast, you must first gather all the necessary tools and ingredients to ensure success in the kitchen.
When it comes to cooking a turkey, having the right tools is essential. Make sure you have a roasting pan large enough to accommodate a 22 pound bird, as well as a reliable meat thermometer to ensure that the turkey is cooked to perfection. A baster will also come in handy for keeping the turkey moist throughout the cooking process.
In addition to having the right tools, it is important to gather high-quality ingredients to make your turkey truly shine. Start by selecting a fresh, never frozen turkey for the best flavor and texture. Make sure to thaw the turkey properly in the refrigerator for several days before cooking to ensure even cooking.
When it comes to seasoning the turkey, the possibilities are endless. You can go traditional with a simple salt and pepper rub, or get creative with a flavorful herb butter or spice rub. Whatever seasoning you choose, be sure to generously coat the turkey both inside and out for maximum flavor.
In addition to seasonings, don’t forget to stuff the turkey with aromatics such as onions, garlic, and fresh herbs to infuse the meat with even more flavor. These ingredients will also help keep the turkey moist as it cooks, resulting in a juicy and tender bird.
As you prep your turkey for roasting, don’t forget to truss the bird to ensure even cooking. Trussing involves tying the legs and wings of the turkey close to the body with kitchen twine to create a compact shape that cooks evenly. This step may seem intimidating at first, but with a little practice, you’ll be trussing like a pro in no time.
Once your turkey is prepped and ready to go, it’s time to preheat the oven and get ready to roast. Remember to baste the turkey regularly throughout the cooking process to ensure a golden brown and crispy skin. And don’t forget to let the turkey rest before carving to allow the juices to redistribute, resulting in a moist and flavorful final product.
With the right tools and ingredients, prepping for success in cooking a 22 pound turkey is easier than you think. By taking the time to gather everything you need and properly season and prepare the bird, you’ll be well on your way to mastering the art of cooking a perfect Thanksgiving feast. So roll up your sleeves, sharpen your knives, and get ready to impress your guests with a delicious and beautifully roasted turkey.
Roasting Magic: Bringing the Bird to Life
Ah, the art of roasting a turkey – a crucial step in mastering the perfect Thanksgiving feast. As you embark on this culinary adventure, it’s important to remember that roasting a turkey is more than just cooking a bird; it’s about infusing it with flavor, ensuring it’s juicy and tender, and ultimately bringing it to life on the dinner table for all to enjoy.
The first step in roasting your turkey is to prepare it for the oven. Make sure to remove any giblets or neck from the cavity, and pat the bird dry with paper towels. This will help the skin crisp up nicely as it roasts. Next, season the turkey generously with salt, pepper, and any other herbs or spices you desire. Don’t be afraid to get creative with your seasonings – this is your chance to infuse the bird with your own personal touch.
Once your turkey is seasoned to perfection, it’s time to get it into the oven. Preheat your oven to the appropriate temperature according to the size of your turkey, and place the bird on a roasting rack in a roasting pan. This will allow the heat to circulate around the turkey, ensuring that it cooks evenly and the skin gets nice and crispy.
As the turkey roasts, it will start to fill your kitchen with the most delicious aromas. The smell of roasting turkey is enough to make anyone’s mouth water, and it’s a sure sign that you’re on the right track to creating a mouthwatering masterpiece.
While the turkey is in the oven, be sure to baste it regularly with the pan juices. This will help keep the bird moist and flavorful, and will also help to ensure that the skin gets that beautiful golden brown color that we all love. Basting is a labor of love, but the results are well worth the effort.
As the turkey continues to roast, be sure to keep an eye on the internal temperature. You want to cook the turkey to an internal temperature of 165°F to ensure that it’s safe to eat. Use a meat thermometer to check the temperature in the thickest part of the breast and thigh, and be sure to remove the turkey from the oven as soon as it reaches the desired temperature.
Once the turkey is fully cooked, it’s time to let it rest. This step is crucial, as it allows the juices to redistribute throughout the bird, ensuring that every bite is juicy and flavorful. Cover the turkey loosely with foil and let it rest for at least 30 minutes before carving.
Finally, it’s time to carve the turkey and bring it to the table. Carving a turkey can be a daunting task for some, but with a little practice and confidence, you’ll be serving up Thanksgiving joy in no time. Start by removing the legs and wings, then slice the breast meat against the grain for maximum tenderness.
As you present your beautifully roasted turkey to your guests, you’ll feel a sense of pride and accomplishment. You’ve successfully brought the bird to life, infusing it with flavor and ensuring that it’s juicy and tender. And as your guests take their first bite, you’ll know that all of your hard work has paid off.
Roasting a turkey is truly a labor of love, but with the right techniques and a little bit of magic, you can create a Thanksgiving feast that will be remembered for years to come. So go ahead, embrace the art of roasting a turkey, and get ready to bring the bird to life on your dinner table. Happy Thanksgiving!
Carving Confidence: Serving Up Thanksgiving Joy
As you master the art of cooking a 22-pound turkey, one of the most important skills you can acquire is the ability to carve with confidence. Carving a turkey can seem like a daunting task, but with the right techniques and a little bit of practice, you’ll be able to serve up Thanksgiving joy to all of your guests.
The first step in carving a turkey is to let it rest for at least 20 minutes after it comes out of the oven. This allows the juices to redistribute throughout the meat, making it more tender and flavorful. While the turkey is resting, you can take this time to prepare your carving station. Make sure you have a sharp carving knife, a carving fork, and a large cutting board ready to go.
When you’re ready to carve the turkey, start by removing the legs. Hold the drumstick firmly with your carving fork and use your carving knife to cut through the skin between the leg and the body. Once you’ve made the initial cut, you can use your knife to gently pull the leg away from the body, exposing the joint where the thigh meets the body. Use your knife to carefully separate the joint, and then repeat the process on the other side.
Next, it’s time to remove the breast meat. Start by cutting along the breastbone, using the tip of your knife to guide you. Once you’ve made the initial cut, you can use your knife to slice the breast meat away from the bone in long, even strokes. Be sure to keep your knife close to the bone to avoid leaving any meat behind. Once you’ve removed the breast meat, you can slice it into thin, even slices and arrange it on a platter for serving.
After you’ve removed the legs and breast meat, you can move on to the wings. Hold the wing firmly with your carving fork and use your knife to cut through the joint where the wing meets the body. Once you’ve separated the wing, you can repeat the process on the other side. The wings can be served whole or separated into sections, depending on your preference.
Once you’ve carved all of the meat from the turkey, don’t forget about the dark meat. The thighs and drumsticks can be easily separated at the joint using your carving knife. Simply cut through the joint and then slice the meat into individual portions. The dark meat can be just as delicious as the white meat, so be sure to include it on your serving platter.
As you carve the turkey, remember to take your time and enjoy the process. Carving a turkey can be a fun and rewarding experience, and it’s a great way to show off your cooking skills to your friends and family. With a little bit of practice, you’ll be carving with confidence and serving up Thanksgiving joy in no time.
how to cook a 22 pound turkey


