Let’s Talk Turkey: Preparing for the Roast!
Ah, the beloved Thanksgiving tradition of roasting a 20lb turkey. It’s a culinary feat that strikes fear into the hearts of many Home cooks, but fear not! With the right preparation and a dash of confidence, you can master the art of roasting a turkey like a pro.
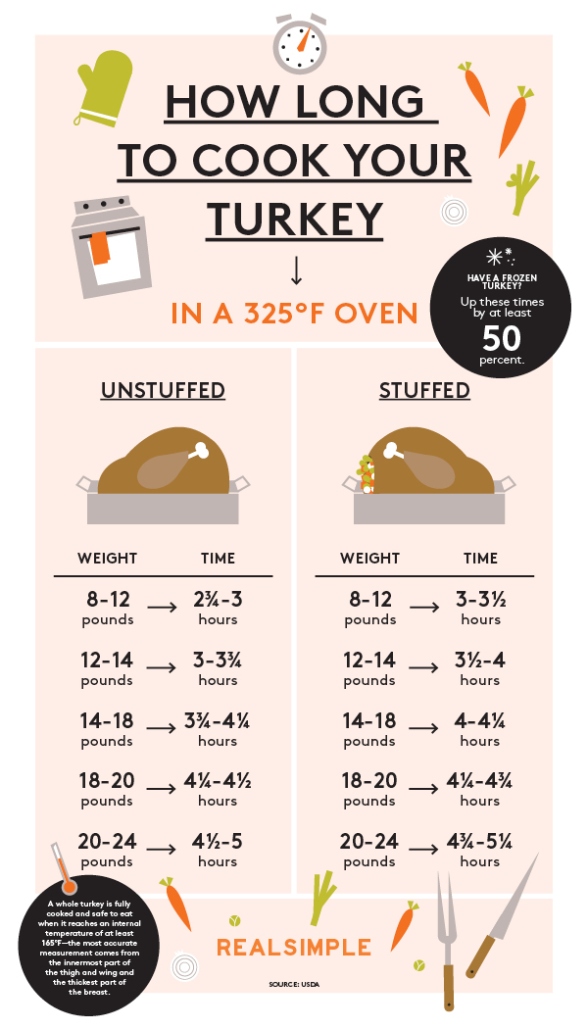
Image Source: sunset.com
The key to a successful turkey roast starts with the proper preparation. Before you even think about seasoning and stuffing your bird, you’ll need to make sure it’s thawed completely. A 20lb turkey can take several days to thaw in the refrigerator, so be sure to plan ahead. Once your turkey is thawed, you’ll want to remove the giblets and neck from the cavity. These can be used to make a flavorful gravy later on, so don’t toss them out!
Next, it’s time to give your turkey a good rinse under cold water. Pat it dry with paper towels, inside and out, to ensure a crispy skin when it’s done roasting. Now comes the fun part – seasoning! Rub a generous amount of salt and pepper all over the turkey, making sure to get into all the nooks and crannies. You can also add herbs like rosemary, thyme, and sage for extra flavor.
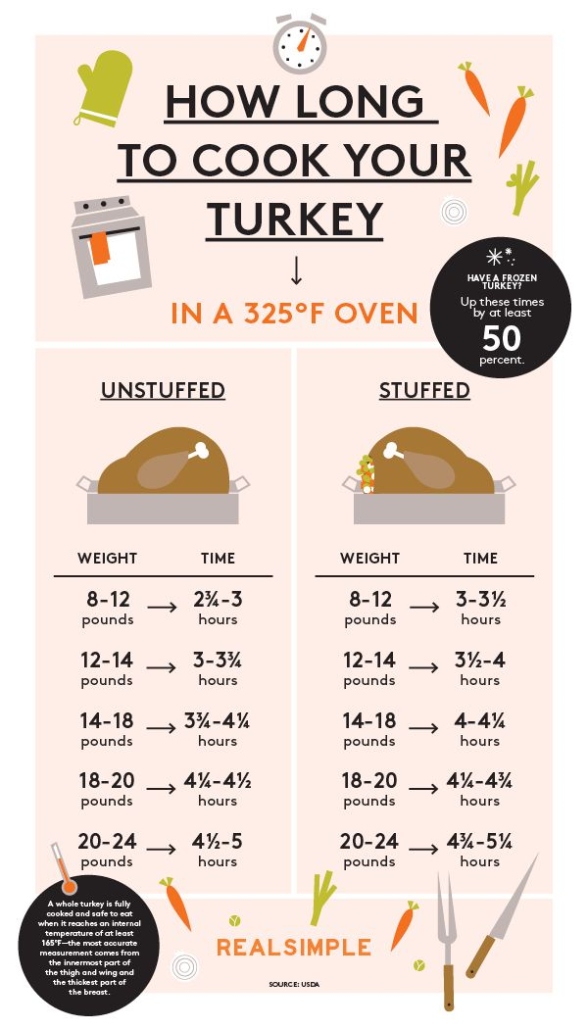
Image Source: realsimple.com
But wait, we’re not done yet! Before you pop that bird in the oven, you’ll want to consider stuffing. Some people swear by stuffing their turkey with a mixture of bread, onions, celery, and herbs, while others prefer to cook their stuffing separately. Whichever method you choose, just make sure to pack the stuffing loosely to ensure even cooking.
Now that your turkey is seasoned and stuffed (or not), it’s time to get it ready for the oven. Preheat your oven to 325 degrees Fahrenheit and place the turkey breast-side up on a roasting rack in a large roasting pan. Tuck the wing tips under the bird and tie the legs together with kitchen twine to help hold its shape.
Before you close the oven door, consider adding a bit of liquid to the roasting pan. This could be chicken broth, white wine, or even just water. The liquid will help keep the turkey moist as it roasts. Cover the turkey loosely with foil and roast according to the package instructions, making sure to baste every hour or so with the pan juices.
As your turkey roasts, your kitchen will start to fill with the mouthwatering aroma of a holiday feast in the making. Resist the temptation to peek too often – every time you open the oven door, you let out heat and extend the cooking time. Trust in your preparation and let the turkey work its magic.
When the turkey is done roasting, use a meat thermometer to check for doneness. The turkey is safe to eat when the internal temperature reaches 165 degrees Fahrenheit. Let the turkey rest for at least 20 minutes before carving to allow the juices to redistribute and ensure a tender, moist bird.
And there you have it – a perfectly roasted 20lb turkey, ready to be the star of your Thanksgiving table. With a little preparation and a lot of love, you can master the art of roasting a turkey and create a meal that will be remembered for years to come. Happy roasting!
The Big Bird: Seasoning and Stuffing Tips!
Ah, the star of the show – the 20lb turkey! To truly master the art of roasting a turkey, one must pay special attention to seasoning and stuffing. These two elements can take your turkey from good to outstanding, elevating the flavors and textures of the meat. Here are some tips and tricks to help you season and stuff your turkey like a pro.
Seasoning is key when it comes to roasting a turkey. A well-seasoned turkey will have layers of flavor that keep you coming back for more. Before seasoning your bird, make sure to pat it dry with paper towels. This will help the seasonings stick better and create a crispy skin during roasting.
For a traditional and flavorful seasoning, mix together salt, pepper, garlic powder, onion powder, and paprika. Rub this mixture all over the turkey, making sure to get into all the nooks and crannies. Don’t be shy with the seasoning – a generous amount will ensure a tasty bird.
If you’re feeling adventurous, try creating a herb butter to season your turkey. Mix softened butter with chopped herbs like rosemary, thyme, and sage. Gently lift the skin of the turkey and rub the herb butter underneath, making sure to spread it evenly. This will not only season the meat but also keep it moist during the roasting process.
Now, let’s talk stuffing. Stuffing a turkey can be a controversial topic, but if done correctly, it can add another layer of flavor to your bird. When choosing a stuffing Recipes-ideas/’>Recipe, make sure it complements the flavors of the turkey. Traditional stuffing with breadcrumbs, herbs, and vegetables is always a safe bet, but feel free to get creative with ingredients like dried fruits, nuts, and sausage.
When stuffing your turkey, make sure to pack the cavity loosely. Overstuffing can lead to uneven cooking and a soggy texture. If you have extra stuffing, bake it separately in a dish to ensure it cooks evenly and safely.
To prevent any food safety issues, make sure the stuffing reaches a temperature of 165°F when cooking inside the turkey. Use a meat thermometer to check the temperature in the thickest part of the stuffing to ensure it’s safe to eat.
Once your turkey is seasoned and stuffed, it’s time to get it into the oven. Preheat your oven to the appropriate temperature (usually around 325°F for a 20lb turkey) and place the bird in a roasting pan. If you want to add some extra flavor, pour some chicken or turkey broth into the bottom of the pan before roasting.
Cover the turkey loosely with foil and roast it according to the recommended cooking times. Baste the turkey every hour with pan juices to keep it moist and flavorful. About halfway through the cooking time, remove the foil to allow the skin to crisp up.
To ensure your turkey is cooked to perfection, use a meat thermometer to check the internal temperature. The turkey is done when it reaches 165°F in the thickest part of the thigh. Remove the turkey from the oven and let it rest for at least 30 minutes before carving.
With these seasoning and stuffing tips, you’ll be well on your way to mastering the art of roasting a 20lb turkey. The flavors and textures of your bird will be a hit at any holiday meal, leaving your guests coming back for seconds and thirds. So, get ready to impress with your perfectly seasoned and stuffed turkey – it’s time to roast away!
Into the Oven: Perfecting the Roast!
So, you’ve prepped and seasoned your 20lb turkey, and now it’s time to get that bird into the oven and start the roasting process. This step is crucial in ensuring that your turkey turns out perfectly juicy and flavorful. With a few key tips and tricks, you’ll be well on your way to roasting success!
First things first, make sure your oven is preheated to the correct temperature. For a 20lb turkey, you’ll want to set your oven to 325°F. It’s important to cook the turkey low and slow to ensure that it cooks evenly and doesn’t dry out.
Next, place your turkey on a rack in a roasting pan. This allows for air circulation around the turkey, which helps it cook more evenly. You can also add some aromatics like onions, carrots, and celery to the bottom of the pan to enhance the flavor of the turkey as it roasts.
Now, it’s time to get that turkey in the oven! Place the roasting pan on the center rack and let the turkey cook for about 15 minutes per pound. So, for a 20lb turkey, you’ll be looking at around 5 hours of cooking time. Remember to baste the turkey every 30 minutes or so with the pan juices to keep it moist and flavorful.
One of the most important things to remember when roasting a turkey is to use a meat thermometer to ensure it’s cooked to the proper temperature. The turkey is done when the internal temperature reaches 165°F in the thickest part of the thigh. Make sure to insert the thermometer into the meat, away from any bones, for an accurate reading.
As the turkey roasts, you’ll start to notice the skin turning a beautiful golden brown. If you find that the skin is browning too quickly, you can tent the turkey with foil to prevent it from burning. This will also help the turkey cook more evenly.
Once the turkey has reached the proper temperature, it’s time to take it out of the oven. Let the turkey rest for at least 20 minutes before carving to allow the juices to redistribute throughout the meat. This will result in a juicier and more flavorful turkey.
And there you have it – the perfect roasted 20lb turkey! With a little patience and attention to detail, you can master the art of roasting a turkey and impress your family and friends with a delicious holiday meal. So, don’t be afraid to get creative with your seasonings and stuffing, and remember to take your time and enjoy the process. Happy roasting!
Carving Perfection: Serving Up the Turkey!
So, you’ve successfully roasted a 20lb turkey to golden perfection – congratulations! But now comes the moment of truth: carving the bird and serving it up to your eagerly awaiting guests. Carving a turkey may seem like a daunting task, but with the right technique and a bit of practice, you’ll be able to carve like a pro in no time.
First things first, make sure you have a sharp carving knife and a sturdy cutting board. It’s important to have the right tools for the job to ensure clean, precise cuts. Begin by removing any twine or trussing from the turkey and allowing it to rest for at least 20 minutes before carving. This will help the juices redistribute and make for a more flavorful and moist bird.
Start by removing the legs and wings. Hold the turkey steady with a carving fork and use your carving knife to cut through the skin between the breast and thigh. Once you reach the joint, use your knife to separate the leg from the body. Repeat on the other side. Next, remove the wings in the same manner, cutting through the joints to release them from the body.
Now it’s time to tackle the breast meat. Make a horizontal cut along the breastbone, starting at the top of the bird. Use your knife to follow the contour of the breast, slicing the meat away in one smooth motion. Repeat on the other side. Once the breast meat is removed, slice it against the grain into thin, even slices. This will ensure tender, juicy meat that is easy to eat.
Don’t forget about the dark meat! The thighs and drumsticks are a favorite for many turkey lovers. To remove the thigh meat, locate the joint where the thigh meets the body and use your knife to separate the two. Repeat on the other side. The drumsticks can be removed by cutting through the joint that connects them to the thighs.
When it comes to serving up the turkey, presentation is key. Arrange the slices of breast meat on a platter, fanning them out for a visually appealing display. Place the dark meat alongside the breast, with the wings and drumsticks arranged at the ends. Garnish with fresh herbs or citrus slices for an extra touch of elegance.
As you carve and serve the turkey, be sure to save the carcass for making Homemade turkey stock. Simply simmer the bones with water, vegetables, and herbs to create a rich, flavorful broth that can be used in soups, stews, and sauces. Waste not, want not!
Carving a turkey is a skill that takes practice, but with a bit of patience and the right technique, you’ll be able to serve up a beautiful, delicious bird that will impress your guests. So, don’t be intimidated – grab your carving knife and get ready to carve your way to turkey perfection!
how to cook a 20lb turkey


